There are a lot of leashes available in the market, but some pet owners love to DIY dog leashes with custom ideas.
You may find it trivial but, a leash is an important tool to train your dog’s social manners, or to walk properly outside.
For those pet owners, we have got 11 new and latest DIY dog leashes ideas in this article which you can easily try at home.
What are you waiting for? Let’s get started!
Table of Contents
- 11 Custom and Best DIY Dog Leashes Ideas
- 1. DIY Dog Leashes Using Fabric
- 2. DIY Dog Leashes using Heavy Webbing
- 3. Crown Style DIY Dog Leashes
- 4. DIY Dog Leashes of three Knot Slip Lead
- 5. Leather Dog lead
- 6. Handmade Climbing Rope DIY Dog Leashes
- 7. Weave and Rivet Style Leather DIY Dog Leashes
- 8. Dyed Using Ombre Method DIY Dog Leashes
- 9. Paracord Dual dog Leash Splitter
- 10. DIY Dog Leashes Out of Rope with the Broach Loop and Double Fisherman’s Knot
- 11. Paracord Cobra Weave DIY Dog Leashes
- Important Instructions to Consider for DIY Dog Leashes
- Conclusion
11 Custom and Best DIY Dog Leashes Ideas
We have come up with 11 amazing DIY dog leash projects for you and your pooch.
Stay on till the end.
You can try making this custom idea in your free time.
If you want to be someone who has a special and unique leash at the park or if you want to make it as a great gift for your friend who owns the dog you can try this charming dog idea right now!
Have enough inspiration to start the DIY process?
1. DIY Dog Leashes Using Fabric
Do you also throw scrap fabric? This time don’t repeat this mistake because you can make a dog leash out of it.
I am going to tell you a popular way of how to make a fabric dog leash at home easily!
Accessories Required
- Fabric scraps cut it into 5″ x 90″ strips
- Lobster claw clasp with a 1″ opening (You can easily find it in any hardware store)
- Heavy-duty sewing needle
- Sewing Machine
- 1/2 yard decor bond fusible interfacing
Level of Difficulty: Moderate to Difficult
Step 1: Get 20 beautiful squares or else you can cut the fabric into 5″ long strips this will be enough to make a 90″ length long piece.
Step 2: Now cut the strips of interfacing 5″ wide. You’ll require 2-3 strips as per the width of your interfacing. Cut enough to make it approx 88″.
See the photo given below.
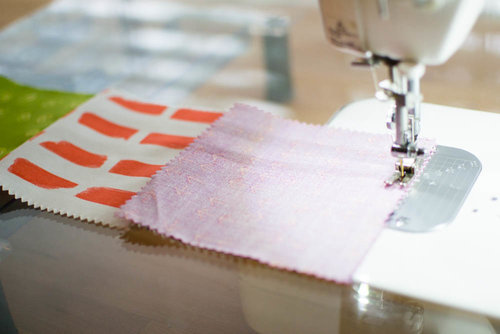
Step 3: Use 1/4″ seam allowance. Sew the 20 beautiful squares or 5″ wide fabric scrap pieces together to make it a strip of 90″ long. Now press the seam allowances open to decrease the volume.
Step 4: Stick the interfacing strips with the back of a long scrap piece. You have to leave 1 without interfacing at each end. You can join the interfacing strips next to each other or could overlap them by about 1/8.
Step 5: Now fuse the fabric side using lots of steam. It will take time so make sure to correctly fuse the interfacing.
Step 6: Double up the long strip in half and then press it. Afterward, open it and press the long edge which is to the center. Once more fold that in half.
Step 7: Now we have to do top stitch means sewing in a slightly longer stitching length on both ends(approx 1/8″ from the corner)Remember that you must have a heavy-duty needle. Sew on both sides starting at the end so that it reduces the rippling along the strap.
Step 8: Glide the clip in the strap. Double up the edge of the strap where there is no interfacing. Double the strap again for about 1″. Clip it in place till you the sewing machine.
Step 9: Sew into rectangles over the earlier top stitching at the sides this is to secure the edge of the straps. You can sew “X” shape rectangles for durability. For more strength, you can sew around the rectangles two times. Check the image given below
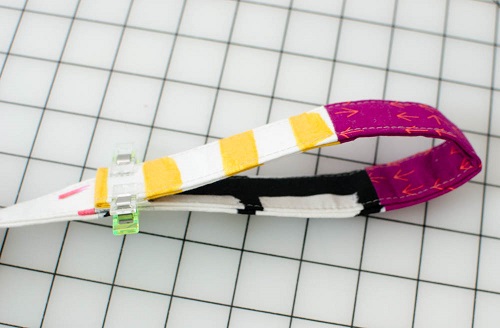
Step 10: Again fold the raw edge bottoms of the strap just like before. Fold the strap back to make 7″ handle you can take any measurement size as per your wish. Pinch in a place and sew the rectangles to safeguard it like the other end.
We are done here! Now you are ready to use a fabric leash for your pooch!
Read More: Teach a Puppy to Walk on a Leash | Train an Older Dog to Walk on a Leash | Train Your Dog to Walk Without a Leash
2. DIY Dog Leashes using Heavy Webbing
Do you like a strong durable dog leash for your pooch? Want to learn easy-peasy fabric plus webbing dog leash?
Pull up your socks then!
You can learn it in this article. We have given you a tutorial with that you can make a durable webbing leash easily at home.
Material Required
- 1-inch black nylon heavy webbing
- Sewing machine
- Thread
- Swivel snap hook
- Ruler
- Lighter
- Candle
- 1″ ribbon (Any color of your choice)
Level of Difficulty: Moderate to Difficult.
Step 1: Measure and cut the webbing and ribbon that you got to create a 6-inch leash. Cut your nylon webbing up to 80inches and ribbon for about 82 inches
Step 2: Now burn the webbing and ribbons end. With the help matchstick light the candle. Now more the ends of both webbing and ribbon delicately. It will melt the corners of the webbing and the ribbon which will secure fraying in the future,
Step 3: Now double up 1″ of the ribbon on the back of nylon webbing. Stitch across the ribbon to fix it to your webbing.
Step 4: Stick the ribbon with your nylon webbing. Begin on the edge of the attached ribbon-like in the previous step. Now you have to line up the ribbon to make it sit in the center of your webbing. Take a pin and place it at every 6 inches so that the ribbon remains stable and fix and at the middle.
There must be a 1″ ribbon left, when you reach the end. Now fold the rest ribbon over and by using a pin stick it.
Step 5: Stitch the ribbon with the webbing now. You need to place the needle of the sew machine very close to the ribbon. At this point, you should sew at a medium speed with a heavy-duty needle of course so that the needle doesn’t break in the middle.
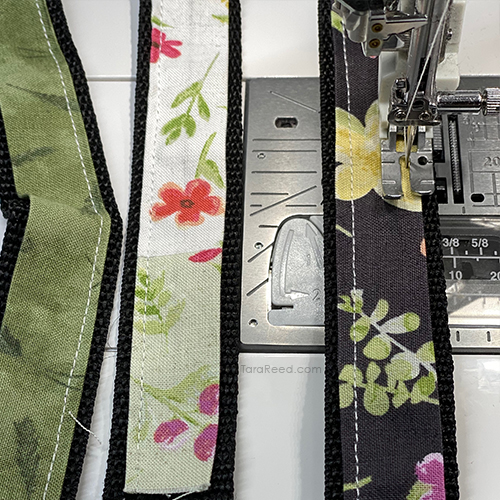
Now unfasten the pins and repeat the same process on another part of the ribbon. Two sides of the ribbon will now be safe to your webbing.
Step 6: You have to stitch across the other 1″ of the ribbon-like you folded in step 4
Step 7: Now you have to make the handle of your pooch leash. Try folding over 8″ of webbing/ribbon while the ribbon will be on the outer side. You can use the image as a reference. Use the box X stitch to stick the webbing/ribbon to itself.
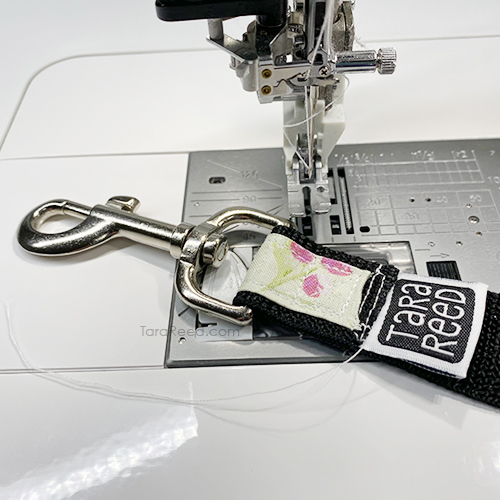
You must lower the speed of your machine because it will help you to stitch that easily. Make the box X for about 1.5 x 1″. Make sure that the box X should go close to the corner of the folded over nylon webbing.
Step 8: Now it’s time to attach the swivel snap hook. Slide the swivel snap hook on the other end (basically on the opposite side of the handle) of the webbing. Now fold few inches of webbing over, somewhere between 1 and 2 inches.
Sew one side of the stitches close to the swivel snap hook. Keep on sewing forward, backward again, and again for four times. Now move on till the edge of the folded webbing piece and repeat one more set of stitching. Repeat the same thing again four times.
Step 9: Attach the leash to your pooch, and you go to go for an evening walk!
Hang on! Try the next coming up amazing knots!
3. Crown Style DIY Dog Leashes
Do you want a hypnotic and durable leash for your dog? Then you can make it your home. We have come up with a crown style dog leash for you that is easy on your hand.
Crown style braiding requires minute detailing if you miss one step it can lead to blunder. You have to following each step carefully.
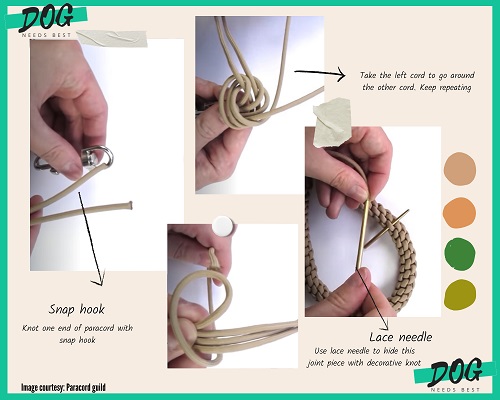
Level of Difficulty: Difficult and time-intensive
Accessories Required
- Two cords (39.5 feet for a 3.5-foot leash)
- Two cords each of 3 feet long
- Swivel or a snap hook
- A lacing needle
- Scissors
- A lighter
It is made of stacking knots one over the other. It is a comfy dog leash that your pet will enjoy wearing.
For taking this DIY project at home you can use the given below tutorial.
Full Tutorial: Paracord guild YouTube Channel
4. DIY Dog Leashes of three Knot Slip Lead
Slip leashes are basic, yet versatile of all leads. It is the combo of a leash and dog collars that is easy to use and design.
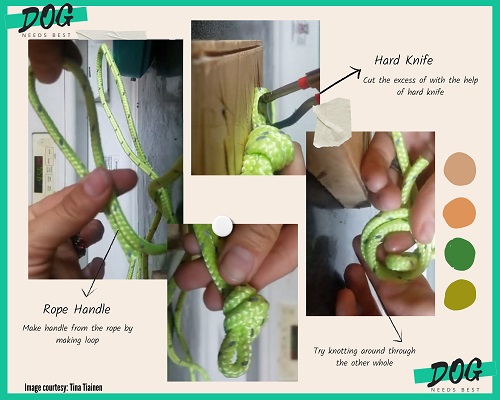
Slip leads can also be transformed into a head harness or a body harness for your dog only if you know how to do it.
Level of Difficulty: Easier than easy
Dog leash making supplies
- Polypropylene rope
- Hard knife
- A lighter (to seal the ends)
To make a simple three-knot slip lead you can check the tutorial mentioned below
Full Tutorial: Tina Tiainen YouTube Channel
Read More: Ways to Hold a Dog Leash | How to Stop Dog from Pulling on a Leash
5. Leather Dog lead
We all know how durable are leather leashes, and how great they are for forgiving grip stability. They are less likely to slip from our hands therefore, it is the most prime reason why should we make a leather dog leash for our pooch!
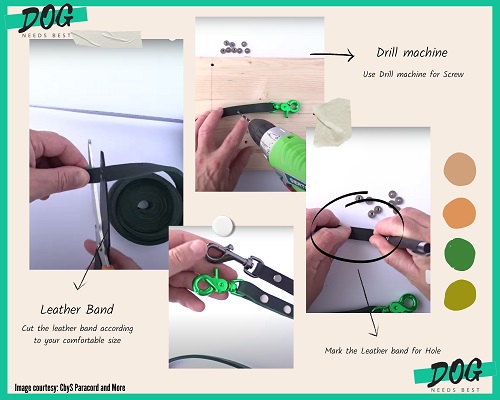
Level of Difficulty: Moderate
Material Required
- 15 mm Leather band
- Stainless steel Chicago screw, M 3 x 5 mm length
- Swivel eye clip carabiner
- Scissors
- A superglue
- Measuring tape
- Drill/wood drill it 4 mm
Lets DIY leather dog lead then by watching this YouTube tutorial.
Full Tutorial: CbyS Paracord and More YouTube Channel
6. Handmade Climbing Rope DIY Dog Leashes
Using climbing rope to make a dog leash is an interesting DIY project. The reason why included a handmade climbing dog leash is that because it is Strong ad robust, durable, low in maintenance, and it is light.
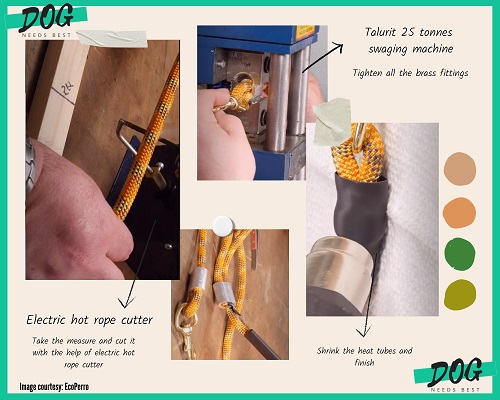
Level of Difficulty: Moderate to difficult.
Material Required
- Climbing rope of course
- Aluminium and brass fittings
- Talurit 25 tonnes swaging machine
- Electric hot rope cutter
- Heat shrinking tube
With the given below tutorial, you can easily make a dog leash out of climbing rope at home.
Full Tutorial: EcoPerro YouTube Channel
Do you like stylish leash then, the next type of leash is just for you!
7. Weave and Rivet Style Leather DIY Dog Leashes
Simple leather leash is boring to want to try some unique weaving style with it?
We understand, you want some unique DIY project therefore, we have got a rivet style leash design tutorial for you.
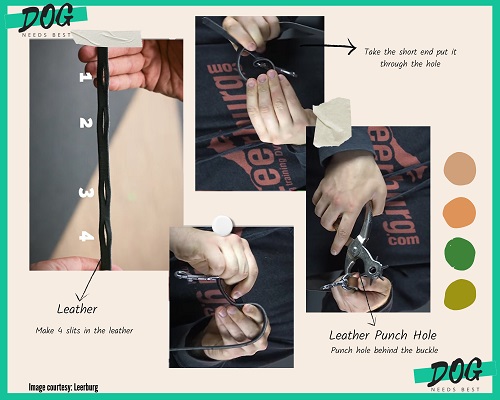
Rivet designs are higher in strength. It can withstand a higher strain works ideal for large size breed dogs.
Level of Difficulty: Moderate to difficult.
Accessories Required
- Leather hole punch
- Utility knife
- Screwdriver
- Leather strap
- Leash snap
- O-ring (optional)
- Thread locker blue
- Chicago screws
You try making this leash by the help of this tutorial given below
Full Tutorial: Leerburg YouTube Channel
Learn More: You can also read about how to train a dog to walk on a leash beside you? Get all information here.
8. Dyed Using Ombre Method DIY Dog Leashes
Do you love colors and paints? Are you a seeker of fancy dog leashes, but don’t get any in the market?
What if we tell you that you can make your own colourful leash at home. Let’s get started
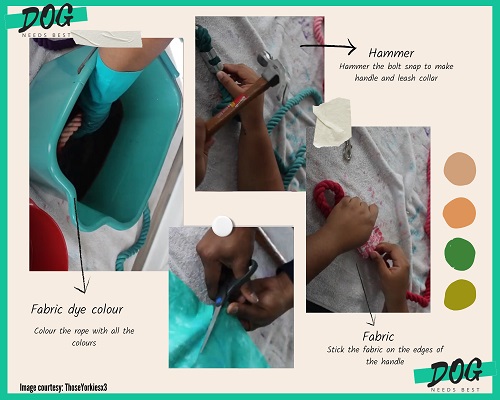
Level of Difficulty: Moderate
Material Required
- Fabric Dye colour (petal pink, teal, and purple)
- Cotton craft rope
- 3 different fabric
- Rope clips
- Bolt snap
- Hot glue gun
- A bucket (to mix dye)
- Good pair of gloves (to avoid colours on our hands)
- Vinegar
- Scissor
- Hammer
Watch this tutorial to makes replenish the dog leash for your pooch.
Full Tutorial: ThoseYorkiesx3 YouTube Channel
9. Paracord Dual dog Leash Splitter
The pacacord is made of strong nylon cords and each individual cords is made of numerous smaller woven strands. This makes it unbreakable, therefore using a paracord for a dog leash is very useful for pet owners who have large breed dogs.
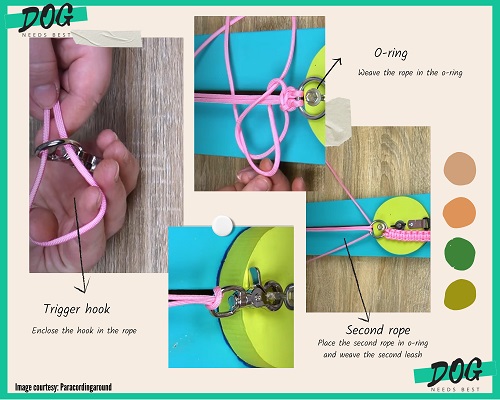
Do you have two dogs and wish to use a single leash? Then it is possible because we have included paracord leash for the dual dogs. With the help of this DIY project leash, you can go for walk with both of your dogs without any hassle.
Level of Difficulty: Moderate
Material Required
- Paracord rope
- Trigger hook
- Metal O-ring
- Paracords fids
- Scissors
- A burner
For making this versatile leash you do need to watch the tutorial given below
Full Tutorial: Paracordingaround YouTube Channel
Read the next DIY project to know more!
10. DIY Dog Leashes Out of Rope with the Broach Loop and Double Fisherman’s Knot
With simple rope, you can try making 2 different style knots dog leash for your pooch. Fisherman’s knot is a bend used for rescue and climbing. It is used by making a double overhand knot, with strangle knot.
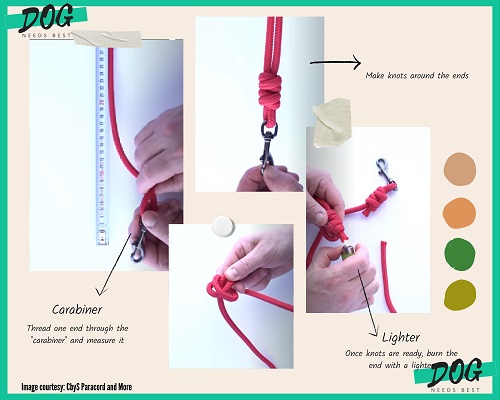
Broach is also a simple kind of knot that gives security to your dog while using a leash to walk.
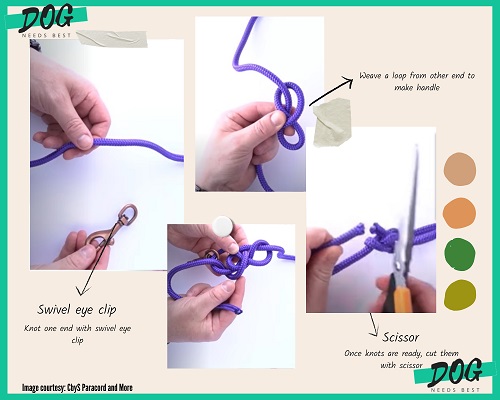
Level of Difficulty: Easy
Material Required
- PPM Cord
- Scissors
- A Lighter
- Swivel eye clips
- Measuring tape
You can easily craft both kind of knots leash with a PPM cord. To make this click the link given below.
Full Tutorial: CbyS Paracord and More YouTube Channel
11. Paracord Cobra Weave DIY Dog Leashes
Cobra design paracord leash is very in style leash. It can hold up in the toughest terrain and even in the worst weather. With this leash, you can easily go out hiking with your four-legged friend.
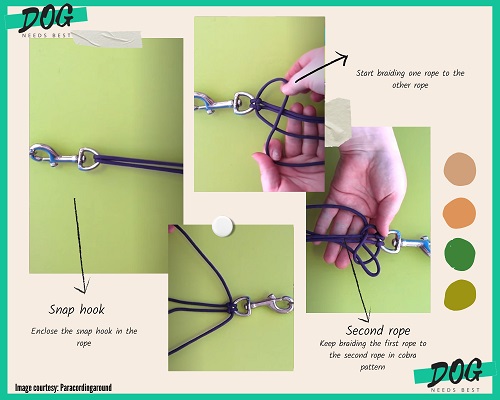
To make this durable a great accessory for any outdoor man is easy. The material required to make this kind of leash is easily available on the market.
Level of Difficulty: Moderate
You must have the following leash supplies:
- Paracord strands
- Clamp
- A pair of scissors
- Measuring tape
- Lighter
Watch this video to make a paracord dog leash using cobra stitch for your pet easily at home.
Full Tutorial: Paracordingaround YouTube Channel
If you are making a dog leash at home, you must know…..
Important Instructions to Consider for DIY Dog Leashes
It is highly important to make a calculated and right size leash for your pooch. It is not necessary that a leash made for a golden retriever may be suitable for a poodle. There it is important to follow some factors before making a leash for your dog.
Length Matters!
The ideal or desired length of the dog leash is 6 feet, but sometimes you may want it to be a longer or shorter leash.
For instance, you are looking for a short leash during the training period of your dog for more control, or you wish to keep a long leash to let your dog enjoy his freedom during the walk.
Therefore, it is vital to make a desired length of a leash as per your dog and also for what purpose you need it.
Chew-Proof Material is a Saviour
We know most of the dogs enjoy chewing their leash, or they enjoy chewing anything they get on their mouth on. So, this can completely spoil your DIY leash!
So, if your dog loves chewing, or he is a chewer try to make a DIY from rope or from something strong material. Some dedicated chewer dogs might also chew the rope, but don’t worry it can last more than many other materials.
Secure Handle
The handle of the leash is a very important part. When you start making the leash project make sure to consider comfortable handles.
It is actually not at all daunting to add supplementary fabric for extra protection of the handle. In order to make sure, that the handle won’t hurt your hands. It is ideally vital for those pet owners who have large or strong pups.
Thickness for Lasting
The thickness of the leash determines its long-lasting life. It is highly essential to use a thick leash for stronger or larger dogs. Otherwise, they may get a chance to escape!
Usually smaller breed dogs do not require a thick leash, but large dogs do! The best way to make a leash from the brand you trust.
Big dogs are stronger than small therefore, you require a thicker leash to put control of them.
Secure with Clasp
The foremost safety feature of a dog leash is Clasp. It is the main part of any pet leash therefore, it becomes crucial that you choose something secure.
When you go to buy a clasp look for real metal material also that it is easy to operate. Considering recommended standards claps is an important factor to consider while taking a DIY leash project.
Conclusion
If you have fun experimenting with things and like unique dog leashes you can try a DIY dog leashes at home. We have cover 11 unique styles mentioned above. It is easy to make and also strong and durable in use. We have covered all the details, so you can easily begin the DIY process.
If you have any other fun DIY tips we would love to hear it from you! Give us your feedback in the comment section below!
All the best with your new DIY dog leashes project!
Also Read:
- How to Get a Stubborn Dog to Walk On a Leash?
- What Do You Do If An Off-leash Dog Approaches You While You Are Walking a Dog?
- What Is The Least Effective Method To Retrieve A Dog That Has Got Off-Leash?
References:
- DIY Dog Leashes – The Bark
- How to Teach a Puppy to Walk on a Leash – American Kennel Club
- How to Buy the Right Dog Leash – Men’s Journal


